

Taking a WordPress site offline is an important step that website operators have to take for various reasons.
Perhaps an extensive update is pending, in which You or your WordPress freelancer do not want visitors to encounter half-finished content, or there are legal reasons that require temporary deactivation. Whatever the reason, going offline must be done thoughtfully and carefully to avoid data loss and maintain the integrity of the website.
What is treated
In this article, we'll explore different methods you can use to take your WordPress site offline or take individual pages of it offline.
We will cover plugins that can be used for maintenance purposes, explain how to enable WordPress' built-in maintenance mode, and introduce alternative approaches such as editing the .htaccess file or manually deleting files from your web hosting account.
We will also discuss how you can remove individual pages from the public domain without affecting the entire website.
More in-depth considerations on the topic of "Taking a WordPress site offline"
It is important to understand that taking a website offline also affects the visitor experience.
Therefore, you should always have clear communication in place to inform your visitors about the status of the website. A good backup system is also essential before you make any changes to ensure that no content is irretrievably lost.
Let's now explore the different options available to you to take your WordPress website offline.
Taking a single page offline
It is not always necessary to take the entire WordPress website offline. Sometimes you may just want to make a single page or post temporarily invisible to visitors. WordPress makes it easy to do this without the need for additional plugins or complicated settings.
The concrete steps for your WordPress site
To take a single WordPress website offline, follow these steps:
Log in to the WordPress dashboard and navigate to the 'Pages' or 'Posts' section, depending on which type of WordPress site you want to take offline.
Find the page or post you want to edit and click on 'Edit'.
In the editing screen, you will find the options for the visibility of the WordPress website in the publishing module. Click on 'Edit' next to the visibility setting.
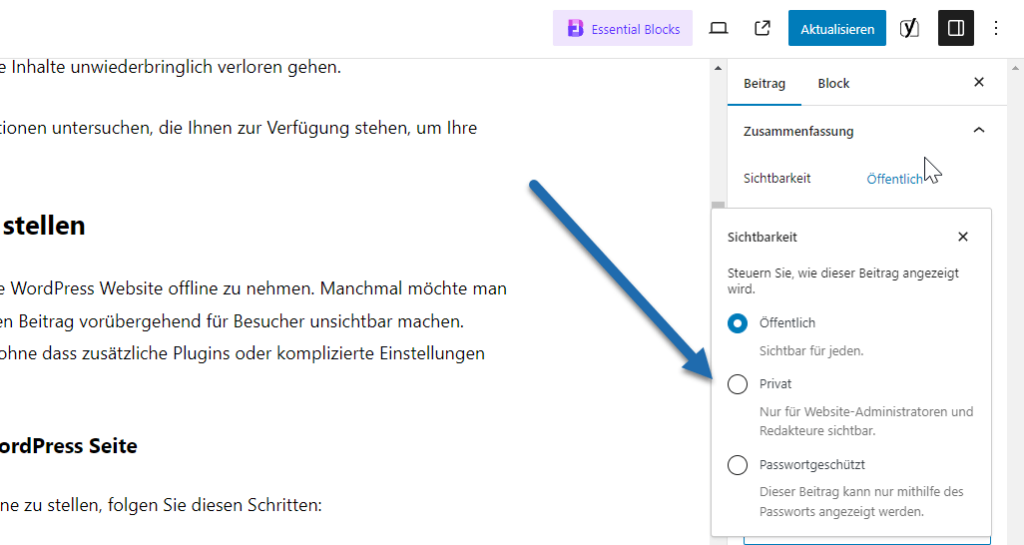
You now have the option of marking the page as 'Private' or resetting the status to 'Draft'.
- PrivateThe WordPress website is only visible to users who have at least the status of editor. This is useful if you have content that should only be accessible to team members or certain user groups.
- DraftThe page is invisible to all visitors and is not displayed in the front end of the website. It remains visible in the backend and can be edited further.
Once you have selected the desired setting, save the changes by clicking on 'OK' and then 'Update'.
This method is ideal if you are working on a specific website and want to make sure that no one sees the changes until they are finished, or if you have a page that you only want to be accessible for a certain time or to certain people. It's a quick and user-friendly method that emphasizes the flexibility of WordPress when managing content.
Use of maintenance mode plug-ins
If you are planning to carry out maintenance work on your WordPress website or implement major updates, a maintenance mode plugin can provide an elegant solution to make your site temporarily inaccessible to visitors.
These plugins allow you to display a custom message telling users that the page is currently being worked on, ensuring professional handling of maintenance times.
Plugin tip: WP Maintenance Mode
One of the most popular WordPress plugins of this type is "WP Maintenance Mode", which is easy to install and configure.
Once enabled, you can set up an engaging "Coming Soon" or "Under Construction" page to display in place of your regular content. This not only helps to improve the visitor experience, but also prevents unfinished content or potential errors from becoming publicly visible during the editing phase.
Plugin tip: WP-Optimize
Another useful WordPress plugin is "WP-Optimize", which offers functions for improving website performance in addition to maintenance pages. Setting up these plugins is usually straightforward: Once installed, you can choose from various templates and customize them to add your branding and a personal message to the maintenance notice.
Both WordPress plugins offer you the option of defining specific user roles that also have access to the website during the maintenance phase. This allows developers and administrators to continue working on the site, while visitors only see the maintenance page.
It is recommended that you familiarize yourself with how these plugins work before activating them and ensure that all settings are configured correctly. This will ensure that your website transitions smoothly into WordPress maintenance mode and that you can bring the site back online just as easily by deactivating maintenance mode again once the work is complete.
Use of the integrated WordPress maintenance mode
WordPress also offers an integrated mechanism to quickly put your website into WordPress maintenance mode without additional plugins.
This maintenance mode is particularly useful if you are carrying out short-term updates or changes, as it can be activated immediately without having to install and set up a plugin first.
What happens then
If you activate the integrated WordPress maintenance mode, a simple page is automatically displayed informing visitors that the website is temporarily unavailable.
This can be helpful to avoid confronting visitors with potential errors during the update process or if you want to ensure that no changes are made to the database while you are working.
To activate maintenance mode, WordPress automatically creates a file called .maintenance in the root directory of the installation, for example when you update a plugin or a theme. During this process, access to the website is blocked for visitors and the maintenance page is displayed.
As soon as the updates are completed, this file is normally deleted automatically and the website is accessible again as normal.
You can also activate WordPress maintenance mode manually by creating a .maintenance-file with the corresponding PHP code in the root directory of your WordPress installation.
This gives you more control and allows you to include a custom message or design on the maintenance page, providing a more personal touch and maintaining your brand identity during maintenance mode.
But be careful with this half-baked "construction site"
Nevertheless, you should be careful when using maintenance mode manually, as errors in the .maintenance-file can lead to access problems on your website. It is advisable to familiarize yourself with how this file works and ensure that you have a backup copy of your website before making such changes (such as turning on maintenance mode).
The .htaccess method
The .htaccess method is an advanced technique for taking your WordPress site offline. The .htaccess file is a powerful configuration file on your web server that controls how visitors interact with your website. By making specific changes to this file, you can block access to your entire website or specific parts of it.
To take the WordPress site offline using the .htaccess file, proceed as follows:
Connect to your web server via an FTP client and navigate to the root directory of your WordPress installation where the .htaccess file is located. If you cannot see the file, make sure that your FTP client is set to show hidden files.
Open the .htaccess file with a text editor. It is advisable to create a backup copy of the file before making any changes so that you can quickly return to the original state in the event of errors.
Insert the following lines at the beginning of the .htaccess file:
Order deny,allow
Deny from all
These directives instruct the server to deny all users access to the website.
Save the changes and upload the file to your server again. After uploading the modified .htaccess file, access to your website will be blocked and visitors will receive an error message.
If you want to take your WordPress website back online, simply remove the above lines from the .htaccess file and re-upload it to the server.
The advantage
The advantage of this method is that you do not have to make any changes within WordPress and that you can take your website offline quickly and effectively.
However, you should be familiar with the basics of web server configuration in order to avoid undesirable effects.
The .htaccess method is particularly useful if you have technical problems that prevent access to the WordPress backend or if you cannot access WordPress plugins or the dashboard for other reasons.
Creating a custom maintenance page
Creating a custom maintenance page gives you the opportunity to add a personal touch and maintain your brand identity even when maintenance mode is active. If you have HTML skills and prefer a customized solution, you can design a custom maintenance page that will be displayed when your WordPress website is offline.
Here's how to create a custom maintenance mode page:
Create a .maintenance file:
- Create a new file and name it .maintenance.
- Add PHP code that tells WordPress to use this page instead of your normal content. A simple code could look like this:
- You can also use HTML and CSS to create the layout and design of your maintenance page.
Upload the .maintenance file:
- Download the .maintenance-file to the root directory of your WordPress installation. This is usually where you also upload the files wp-config.php and .htaccess find.
Personalization of the maintenance page:
- Create a separate HTML page that contains your maintenance message and the desired design.
- Within the .maintenance-file, you can embed the HTML code of your custom maintenance page or link to a separate HTML file.
Testing the maintenance page:
- After you have uploaded your custom maintenance page, you should test whether it is displayed correctly by opening your website in a browser. The maintenance mode should now be active and the corresponding page should be displayed.
Deactivation of the maintenance page:
- Once the maintenance work has been completed, you can .maintenance-file from the server or rename it to bring your website back online.
Note that while maintenance mode is active, only administrators, such as your WordPRess programmerhave access to the backend of the website. This means that you must be logged in as an administrator to deactivate the maintenance page.
Creating a custom maintenance page is a great way to keep visitors informed about the status of your website as you make changes, while making a positive and professional impression.
