


What is a WordPress multisite and when should it be used?
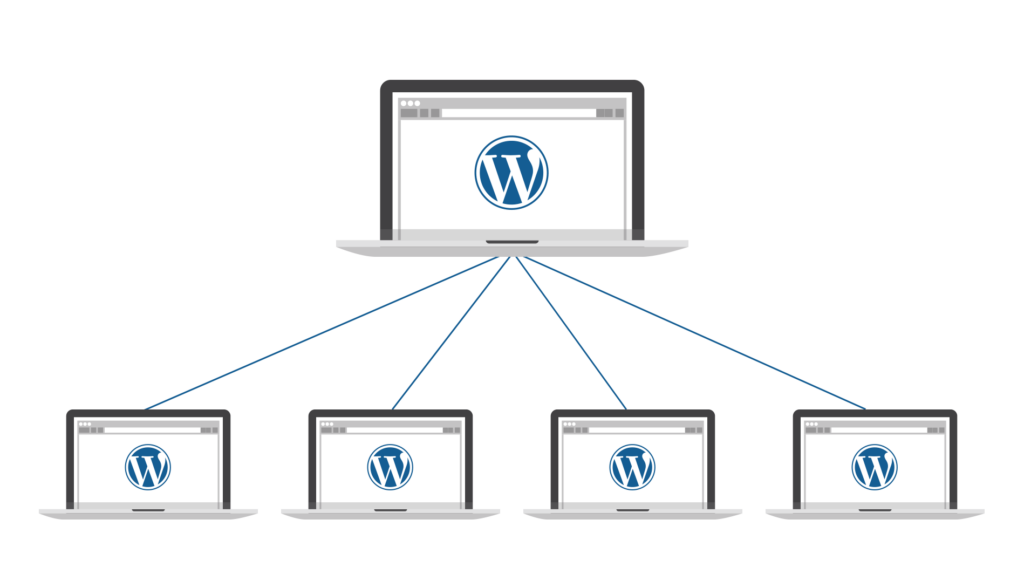
A WordPress Multisite is an advanced feature of the WordPress platform that allows you to manage a network of websites from a single WordPress installation. With a multisite installation, you can create and run multiple, virtually separate websites that all use the same WordPress installation, plugins and themes. Each website in the network can have its own unique content and users, while administration is centralized.
When should you use a WordPress multisite?
Centralized administration
If you need to manage multiple websites that require similar functionalities, a multisite installation provides a centralized platform to manage all these websites. This saves time and resources as you don't have to update or maintain each website individually.
Consistent configuration
A multisite is ideal if you want to run a number of websites with consistent configurations. For example, schools or universities might need a separate website for each class or department, but want all websites to look and function consistently.
User roles and access rights
WordPress Multisite allows you to manage user roles and access rights across the entire network. This is particularly useful for organizations with multiple users who require different levels of access.
Network-wide plugins and themes
If you have a number of websites that all need to use the same plugins and themes, a multisite installation is ideal. You can activate plugins and themes network-wide instead of installing and activating them on each individual website.
Subdomains or subdirectories
A multisite allows you to create websites either as subdomains (e.g. site1.example.com) or as subdirectories (e.g. example.com/site1) can be set up. This can have advantages for SEO and branding.
Resource efficiency
Since all websites run on a single WordPress installation, you can use server resources more efficiently, which would not be the case with many separate installations.
When should you refrain from using a multisite?
Highly specialized websites
If each website you run has highly individual requirements, especially in terms of plugins and themes, a multisite could present more problems than benefits.
Server resources
Multisite networks can use more server resources than a single website. If your hosting service is not sufficient, performance problems could occur.
Complexity
Managing a multisite installation is more complex than managing a single website. If you don't have the technical know-how, multisite administration could be a challenge.
Security
As all websites use the same system, a security vulnerability in one website could potentially jeopardize the entire network.
Overall, a WordPress multisite is a powerful solution for managing multiple websites, but it should only be used when the benefits outweigh the added complexity and potential risks.
Install WordPress Multisite - here's how:
Allow multisite in wp-config.php
To start a multisite installation, you or Your WordPress freelancerfirst activate the multisite functionality in your WordPress installation. To do this, add the following code to your wp-config.php-file before the section "/* That's all, stop editing! Happy blogging. */":
define('WP_ALLOW_MULTISITE', true);This code allows WordPress to initiate the multisite installation. Btw. my WordPress Agency also offers the setup of multisite installations as a service.
Set up the network in the backend
Once you have activated the multisite function, log in to your WordPress dashboard and navigate to "Tools" > "Set up network". Here, select whether you want to use subdomains or subdirectories for your network sites and enter the title and admin email address of your network. Once you have made the settings, click on "Install".

Add wp-config.php and .htaccess
After setting up in the backend, you will be shown two blocks of code that you can add to your wp-config.php and your .htaccess-file. These codes are necessary to configure the network correctly and to control the URL structure. Execute (or your WordPress developer) carefully through the changes, as errors here can lead to problems with your website.
Code for the wp-config.php
Attentionplease be sure to copy the code from the backend, as it may differ from this one depending on the settings.
define( 'MULTISITE', true );
define( 'SUBDOMAIN_INSTALL', true );
define( 'DOMAIN_CURRENT_SITE', 'my-domain.com' ); // ATTENTION, change domain here
define( 'PATH_CURRENT_SITE', '/' );
define( 'SITE_ID_CURRENT_SITE', 1 );
define( 'BLOG_ID_CURRENT_SITE', 1 );
Code for the .htaccess
Attentionplease be sure to copy the code from the backend, as it may differ from this one depending on the settings.
RewriteEngine On
RewriteRule .* - [E=HTTP_AUTHORIZATION:%{HTTP:Authorization}]
RewriteBase /
RewriteRule ^index\.php$ - [L]

# add a trailing slash to /wp-admin
RewriteRule ^wp-admin$ wp-admin/ [R=301,L]

RewriteCond %{REQUEST_FILENAME} -f [OR]
RewriteCond %{REQUEST_FILENAME} -d
RewriteRule ^ - [L]
RewriteRule ^(wp-(content|admin|includes).*) $1 [L]
RewriteRule ^(.*\.php)$ $1 [L]
RewriteRule . index.php [L]
Network management menu and the network settings
Once the Multisite installation is complete, the "Network management" menu will appear in your dashboard. From here you can manage the entire network, including the network settings, where you can configure various options such as registration settings, upload settings and more.
Add a new website to the network
To add a new website to your network, go to the "Network administration" menu and click on "Add new site".
Here you enter the desired details for the new website, such as the URL, the title and the admin of the new blog.
Once you have added the website, you and the assigned admin can log in and start designing and managing the new website.
By following these steps, you have created a working multisite installation that allows you to manage multiple WordPress websites from a single dashboard.
Activating WordPress Multisite on an existing WordPress installation
To activate Multisite on an existing WordPress site, follow the same manual steps as above. There is only one difference: no subdirectories can be used if the website is more than one month old.
How to fix the WordPress multisite cookies error
If you encounter a cookie error when logging into your WordPress multisite installation, you can usually fix it by adding a few lines of code to your website's configuration file. Here is a step-by-step guide on how to proceed:
Backup your wp-config.php file
Before you make any changes, it is important to back up your wp-config.php-file. This file contains important settings for your website and should be handled with care.
Adding the code
- Open the wp-config.php-file, which is located in the root directory of your WordPress installation.
- Paste the following code above the line that says: /* That's it, enough with the editing! Have fun blogging. */:
define('ADMIN_COOKIE_PATH', '/');
define('COOKIEPATH', '');
define('SITECOOKIEPATH', '');
define('COOKIE_DOMAIN', false);
Set up multisite: Activate themes across networks
If you set up a WordPress multisite, you have the option of activating themes for the entire network so that they can be used on all websites:
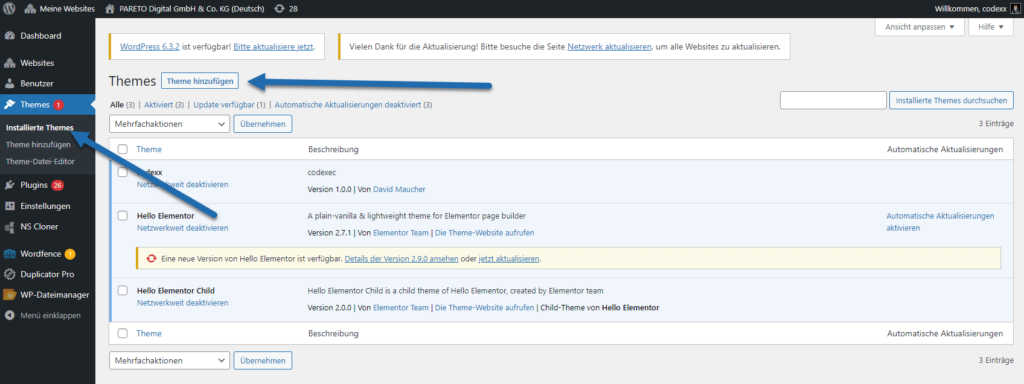
- Network admin dashboardLog in as a network administrator and navigate to the network admin dashboard. This is the area where you can make settings for the entire network.
- Themes menuIn the network admin dashboard, you will find the "Themes" menu. Click on it to see all available themes.
- Install themesIf you want to add new themes, you can install them here. Upload the theme or select it from the WordPress theme directory.
- Activate themesTo make a theme available across networks, you must activate it for the network. Move the mouse pointer over the theme and click on "Network activation". The theme is now available for all websites in the network.
- Individual website settingsAlthough a theme is activated across all networks, it still needs to be selected on each individual website. Website administrators can now select the theme from the list of available themes and activate it for their specific website.
- Theme updatesAs the network administrator, you are also responsible for updating all themes in the network. If an update is available, it is displayed in the network admin dashboard and can be carried out from there for the entire network.
By activating themes across networks, you simplify administration and ensure a Consistent WordPress web design across your entire network. However, it is important to regularly check whether the themes are compatible with the current WordPress version and whether they work properly on all websites.
Set up multisite: Activate plugins across networks
Activating plugins across an entire WordPress Multisite network is an effective way to ensure that all sites in the network have access to the same features and tools. Here's the process for activating plugins across networks:
- Visit the network admin dashboardLog in as a network administrator and go to the network admin dashboard. This is the central location for managing all websites in your network.
- Plugin installationBefore you can activate a plugin across networks, you must install it. To do this, go to "Plugins" in the network admin dashboard and then to "Install". Here you can upload plugins or select and install them from the WordPress plugin directory.
- Network-wide activationAfter installation, you will find the plugin in the list under "Installed plugins". To activate the plugin for all websites in the network, simply click on the "Activate network" option. The plugin is then automatically activated for all websites in the network.
- Management of the plugin settingsSome plugins require configuration after they have been activated network-wide. These settings are normally made in the network admin dashboard and apply to all websites in the network.
- Individual website customizationsAlthough a plugin is activated network-wide, individual website administrators may still be able to make their own settings for the plugin, provided the plugin supports this and the network administrator has granted the corresponding authorizations.
- Manage updates: As the network administrator, you are also responsible for updating all plugins in the network. If an update is available for a plugin, it will be displayed in the network admin dashboard. You can carry out the update for the entire network from there.
By activating plugins across networks, you can standardize the functionality of your websites and simplify administration. However, it is important to check the compatibility of the plugins with your WordPress version and ensure that they work properly on all websites in the network.
User administration in a multisite network
In a WordPress multisite network, managing users and their roles is crucial. Here you can find out how user management works in a multisite network so that you can do this without Help from our WordPress support can implement.
WordPress Multisite user roles: From admin user to network administrator
- Super administratorThe super administrator is the highest level of user role in a multisite network. This user has unrestricted access to the entire network and can create, manage and delete websites, activate/deactivate plugins and themes, assign user roles and much more. There is usually only one super administrator per multisite network, who has ultimate control over all websites in the network.
- Administrator of the individual websiteEach website within the Multisite network has its own administrator. This user is responsible for managing the specific website. The website administrator can create content, activate/deactivate themes and plugins, manage users for their website and adjust the website settings.
- Network administratorThe network administrator is a special role that enables the administration of the entire network. This role can add or remove users, activate/deactivate plugins and themes network-wide, define network settings and much more. The network administrator has control over the entire network, but not over the content of the individual websites.
- Author, publisher, editor, etc.Within each individual website in a multisite network, normal WordPress user roles such as author, publisher, editor, etc. can be assigned. These user roles are limited to the respective website and are not authorized to access or manage other websites in the network.
Proper management of user roles and permissions on your multisite network is critical to ensure security and smooth administration. Network administrators should carefully manage user roles to ensure that each user is given the necessary rights and access for their specific role.
Backups and restores for a WordPress multisite network
Backups and the ability to restore them are essential for the operation of a WordPress multisite network. Backups are usually performed automatically, e.g. as part of of a WordPress maintenance contract. Here are some specialized plugins that support these tasks:
The "UpdraftPlus Premium" plugin
UpdraftPlus Premium is an extended version of the popular WordPress backup plugin. It offers comprehensive functions for backing up and restoring multisite networks. With UpdraftPlus Premium, you can perform scheduled backups, store your data in the cloud and restore individual sites or the entire network as needed. The Premium version offers additional security options and migration tools specifically designed to meet the needs of multisite networks.
The "Duplicator Pro" plugin
Duplicator Pro is another plugin that is suitable for managing backups in WordPress multisite networks. It allows you not only to create backups, but also to migrate websites within the network or to another server. Duplicator Pro is particularly useful if you need to regularly synchronize development and production environments.
The "All-in-One WP Migration" plugin
All-in-One WP Migration is known for its ease of use and reliability when exporting and importing WordPress websites. Therefore it is very widely among WordPress freelancers distributed. For multisite networks, the plugin offers an extension that is specially designed for migration and backup creation from and to multisite installations. With this extension, you can export individual subsites or back up the entire network. The plugin supports a variety of cloud storage options and offers an intuitive user interface.
When using these plugins, it is important to schedule regular backups and ensure that you are familiar with the process of restoring them should this become necessary. It is also advisable to perform backups before any major update or other significant changes to your network.
How does a WordPress multisite work?
WordPress multisites make it possible to run multiple WordPress sites within a network without the need for a separate MySQL database for each site. Unlike individual WordPress installations on different subdomains or domains, where each has its own database, a multisite installation uses a single database for all sites. This simplifies administration considerably, as you only have to maintain one database.
Database structure and administration
Within the shared database, the data of the individual pages is kept separate by separate database tables and unique website IDs. This means that although content such as posts, products and comments are stored in a central database, they are still clearly assigned to the respective pages. Critics may point out that this unnecessarily enlarges the database and could affect performance. However, such disadvantages can be minimized through regular maintenance and the use of up-to-date software. It is interesting to note that even a technology giant like Google relies on SQL databases for its services, which underlines the power of this technology.
Sharing resources
All sites in a WordPress multisite share certain resources, such as themes and plugins. These are installed network-wide and can be activated on the individual sites as required. This leads to centralized administration, where all settings can be made via a single admin access. This saves time and considerably simplifies the management of multiple websites.
Individual configurations
Despite the centralized administration, it is important to configure certain aspects such as SEO individually for each page. Network-wide settings can reduce the administrative effort, but specific adjustments to the individual pages can improve the performance and relevance of the pages for search engines. Although this requires more effort, it can lead to a significantly better performance of the entire network.
Multisite with subdomains or directories?
How Google likes it best
The decision as to whether you should use subdomains or subdirectories for your WordPress multisite has a significant impact on search engine optimization (SEO). Search engines like Google often consider subdomains as separate entities, which means that the domain authority of the main domain is not automatically transferred to the subdomains. This can mean that you have to build a separate SEO reputation for each subdomain from scratch.
In contrast, subdirectories are considered part of the main domain, which means that the SEO efforts of the main site can also benefit the subdirectories. The domain authority of the main domain can therefore have a positive effect on the subdirectories. For this reason, SEO experts often recommend working with subdirectories if the goal is to benefit from the existing SEO strength of the main domain.
How to manage multiple websites in a WordPress multisite network
Managing multiple websites in a WordPress multisite network can be a challenge, but with the right tools and procedures, it can be an efficient process.
Adding a website via the WordPress admin
To add a new website to your Multisite network, follow these steps:
- Network admin dashboardLog in as a super administrator and navigate to the network admin dashboard. This is the central location for managing all websites in your network.
- Add new pageClick on 'Websites' in the network admin dashboard and then on 'Add new'. Here you enter the required information for the new website, such as the URL, the title and the administrator's e-mail address.
- Configure website settingsAfter you have created the new website, you can configure specific settings such as data protection, language and the theme to be used.
- Grant accessAssign user roles and grant access to the website administrator so that they can log in and manage the website.
- Activate themes and pluginsDecide which themes and plugins should be available for the new website. You can activate or deactivate certain plugins and themes for use on the new website.
- Monitoring and maintenanceMonitor the performance and security of the new website regularly. Ensure that updates for WordPress core, themes and plugins are carried out promptly.
By using the network admin dashboard, you can efficiently add new sites and manage existing ones, giving you centralized control over your entire multisite network.
Creating a site from the frontend
To allow users to create their own website, this process takes place via the "/wp-signup.php" page on the main website of the WordPress Multisite installation.
- Access to the creation process: Users can create a website by calling up the URL "/wp-signup.php".
- Login or registration: On this page, users have two options:
- Login with an existing user account: If you already have a user account on the Multisite installation, you can log in here and then create a website.
- Creation of a new user account and a website: Alternatively, you can also create a user account and create a new website at the same time.
This process gives users the flexibility to either create a website or register as both a user and website owner in one step, depending on their needs.
Cloning of websites within a multisite network
Cloning websites within a multisite network can save time and work, especially if you want to use similar website structures. A useful plugin that makes this possible is "NS Cloner." Here's how to use it:
The "NS Cloner" plugin for multisite cloning
The "NS Cloner" plugin was specially developed for WordPress multisite networks and makes it much easier to clone websites. It offers the possibility to duplicate an existing website without having to copy the content and settings manually. Here are the steps to use it:
- Install and activate the pluginSearch for "NS Cloner" in the WordPress plugin directory, install it and activate it on your multisite network website.
- Access to NS ClonerIn the network admin dashboard, you will find a new menu called "Cloner" or "NS Cloner." Click on it to access the plugin.
- Select websiteSelect the website you want to clone. You can select the website from a drop-down list.
- Create target websiteEnter the desired name and domain for the target website that will be cloned. You can also decide whether the website is inactive or automatically redirects to the target website.
- Cloning and customizingStart the cloning process. NS Cloner copies all content, settings, plugins and themes from the source website to the target website. You can then customize the target website according to your wishes.
NS Cloner facilitates the cloning of websites in a multisite network and saves you time and effort. It is particularly useful if you need similar website structures for different areas of your network.
Deactivating or deleting websites in a WordPress multisite network
In a WordPress multisite network, it can happen that a website has to be deactivated or deleted. This could be the case if a website is no longer needed or a customer has ended their contract. WordPress offers various options to deal with such situations.
Deactivating a website
If a website needs to be temporarily taken out of service without losing data, it can be deactivated. The website will then no longer be accessible to visitors, but all files and data will be retained. The site administrator will still have access to the website, even though it is not visible to the public.
Archiving a website
Archiving a website makes it inaccessible to both visitors and website administrators. However, the website and its data are retained. This option is suitable if a website is to be kept but not displayed.
Mark as spam
If a website is marked as spam, it is deleted and the user who created it is prevented from creating further websites. This option is useful for preventing abuse within the network.
Deleting a website
The delete option completely removes the website from the network and deletes all associated data. This action is final and should only be carried out if it is certain that the website and all its contents are no longer required.
Access to management options
To access these options, navigate to the "Websites" screen in the network admin dashboard. There you will find links under the name of each website to perform the desired action. It is important to think carefully before deactivating, archiving, marking as spam or deleting a website, as some of these actions cannot be easily undone.
The most important features of a WordPress Multisite network
Central installation:
A multisite is a single WordPress installation that serves as the basis for all websites in the network. This central installation shares resources such as themes, plugins and user data.
Several websites:
Multisite allows you to create and manage multiple websites in a network. These websites can use different domains, subdomains or subdirectories.
Central user administration:
You can manage users centrally and assign users specific roles and authorizations for the entire network. Users can be active on different websites in the network.
Shared themes and plugins:
Themes and plugins can be installed network-wide and you can decide whether they should be activated on certain websites. This simplifies the management of design and functionalities.
Centralized updates:
Updates for WordPress core, themes and plugins can be managed centrally from the network administrator level and applied to all websites in the network.
Release of content and users:
You can share content and users between the websites in the network. This is particularly useful if you want to use content on several websites without having to create it again.
Independent websites:
Each website in the network can be configured and managed independently. It can have its own theme, its own plugins and its own settings.
Flexibility in domain configuration:
You can choose whether websites are to be used as subdomains (e.g, site1.example.com) or subdirectories (e.g, example.com/site1) are to be configured.
Option to deactivate websites:
You can deactivate, archive, mark as spam or delete websites in the network, depending on your requirements and use case.
Resource efficiency:
Using a shared WordPress installation saves server resources and enables more efficient administration, especially if you run many websites.
SEO benefits:
If you use subdomains, they can be treated by search engines as independent websites, which can offer SEO benefits.
Consistency and branding:
You can enforce uniform branding and consistent settings across all websites in the network, which is helpful if you run multiple websites for the same company or association.
Although WordPress Multisite offers many benefits, its use should be carefully considered as it can also come with some challenges and limitations. It is important to understand whether multisite is the right solution for your specific requirements.
Advantages and disadvantages of WordPress Multisite
WordPress Multisite offers these advantages
More efficient code
A WordPress multisite installation uses a single code base for all websites in the network. This results in clean and efficient code that is easier to maintain and update, as changes only need to be made in one place.
More efficient development
Developing new websites within the network is faster and easier as you can use an existing infrastructure of themes and plugins. This reduces development time and facilitates the implementation of network-wide functions.
More efficient management
All websites are managed from a single dashboard, which simplifies the management of users, updates and security measures. Network administrators can quickly access all websites and make changes without having to log in to each one individually.
WordPress Multisite offers these disadvantages
Complexity
Setting up and managing a multisite environment can be complicated and requires a deeper understanding of the WordPress architecture. This can be a hurdle for beginners or smaller projects.
Performance and scalability
Multisite networks can pose a challenge for hosting due to the shared use of resources. Non-optimized hosting can cause performance problems, especially as the network grows.
Security
Since all websites are based on a single WordPress installation, a security vulnerability in one of the websites can jeopardize the entire network. This requires careful monitoring and regular security audits.
Limited individuality
Although multisite simplifies administration, it can be difficult to make individual adjustments for individual websites, as changes often have a network-wide effect.
Administrative complexity
The central administration of all websites entails additional responsibility. Network-wide updates or configuration changes must be carefully planned to avoid undesirable effects on the entire network.
SEO challenges
SEO can be more complicated, especially when subdomains or subdirectories are used. Each website needs to be optimized individually, and the structure of the network can influence the SEO strategy.
The decision for or against a WordPress multisite should be made after careful consideration of the requirements and resources. It is important to understand the pros and cons and evaluate whether a multisite installation is the best solution for your project.
Are there any requirements for WordPress Multisite?
Setting up a WordPress multisite installation requires a few considerations and preparations by your WordPress programmerbut if the requirements are met, it can be a powerful solution for managing multiple websites.
- Hosting supportMake sure that your web hosting provider supports WordPress Multisite. Not all hosting providers offer this function, so you should clarify this in advance. You will also need sufficient server resources to cope with the additional load of a multisite installation.
- Basic WordPress installationStart with a fresh, clean WordPress installation. It's easier to create a multisite installation from scratch than to convert an existing website afterwards.
- Administrator rightsYou must have administrator access to your WordPress website in order to set up a multisite installation. This means that you must be logged in as a super administrator.
- Backup: Be sure to make a backup of your website before setting up a multisite installation. This is an important precautionary measure, as changes to the WordPress configuration can be undone.
- Domain configurationConsider whether you want to use subdomains (e.g. site1.example.com) or subdirectories (e.g. example.com/site1) for your websites. The choice depends on your website structure and your SEO preferences.
- Careful planningPlan the structure of your multisite network in advance. Think about how the individual websites interact with each other and which shared resources such as themes and plugins should be used.
- SecuritySince all websites on the network run on the same code base, security is of the utmost importance. Use strong passwords and implement security measures to protect the entire network.
- Updates and maintenanceSchedule regular updates for WordPress core, themes and plugins. This is crucial to close security gaps and maintain performance.
- Backup and restoreDefine strategies for backing up and restoring the entire multisite network. This is crucial to avoid data loss in an emergency.
- Knowledge and trainingMake sure that you or your administrators have sufficient knowledge of WordPress and multisite administration. Training and resources are important to effectively manage the network.
WordPress Multisite and WordPress Domain Mapping
Domain mapping is a process whereby individual websites within a WordPress multisite installation are given their own unique domain, rather than acting as a subdomain or subdirectory of the main domain. This allows each website in the network to operate under its own domain, which can be beneficial for branding and SEO.
Here's how the process generally works:
- Domain purchaseFirst you need to buy the domain that you want to assign to the website in your network.
- Configure DNS settingsAfter purchasing the domain, you must configure the DNS settings so that they point to your WordPress Multisite server. This is typically done by setting A-Records or CNAME-Records with the registrar you purchased the domain from.
- Prepare WordPress MultisiteWithin your WordPress multisite installation, you must ensure that the network administration is configured to support domain mapping. In newer versions of WordPress, this is often the case by default.
- Domain Mapping Plugin (if required)In older versions of WordPress, you had to install a domain mapping plugin to enable this functionality. Since WordPress version 4.5, however, domain mapping is a native function and you no longer need a separate plugin.
- Assign websiteGo to the dashboard of the website within your multisite that you want to map to the new domain and add the new domain. This is done in the settings under "Tools" > "Domain Mapping", where you enter and save the external domain.
- SSL certificateIf you want your new domain to be available via HTTPS, you must install an SSL certificate for this domain. This is important for security and is preferred by search engines.
- TestingAfter you have assigned the domain, you should test the website to ensure that it loads correctly under the new domain. Also check that all links and resources are working correctly.
Domain mapping therefore allows you to create a more professional presence for websites within your multisite network, as each website can have its own domain, which is particularly useful for companies and organizations with multiple brands or locations.
Decision-making aid: when a multisite makes sense
Multilingualism
A WordPress multisite installation can be ideal if you need a multilingual website structure. Instead of creating and managing separate websites for each language, a multisite installation allows you to set up each language version as a separate website within the network. This allows for centralized management of all language-specific content while maintaining a clear separation between the different language versions. It also facilitates consistency of design and functionality across all language versions. This is why we like to use this type of website management for Swiss websites. Our clients from Zurich, Basel and other locations in Switzerland now greatly appreciate our WordPress multisite backends.
Internationalization across multiple domains
For companies that operate in different countries, a multisite installation can be useful to have a separate domain for each country. This not only improves local SEO, but also enables specific customization to cultural and regional characteristics. Each domain can be tailored to the needs and expectations of the local market, while the websites are managed and maintained from a central location.
Micro-websites for different products/offers with the same design
If a company offers several products or services and wants a separate online presence for each, a multisite installation can be an efficient solution. Each micro-website can focus on a specific product or offering while maintaining the overarching brand design. This allows for a targeted marketing strategy for each product, while simplifying the management and updating of the websites by sharing resources.
